Shopify Plugin
Accept payments on your Shopify store with Omise. Support for credit cards, bank transfers, e-wallets, and installment payments with easy setup through the Shopify admin.
Overview
The Omise Shopify integration provides:
- Quick Installation: Install from Shopify App Store in minutes
- All Payment Methods: Cards, banking, e-wallets, installments
- Automatic Sync: Order status updates automatically
- Multi-Currency: Accept payments in multiple currencies
- Mobile Optimized: Seamless mobile checkout experience
- Test Mode: Safe testing before going live
Prerequisites
Requirements
Omise Account:
- Active Omise account (Sign up)
- Business verification completed
- API keys available (public and secret)
- Desired payment methods enabled
Shopify Store:
- Active Shopify plan (Basic or higher)
- Admin access to Shopify dashboard
- SSL certificate enabled (standard with Shopify)
- Thailand-based business (or supported country)
Supported Shopify Plans
| Plan | Supported | Notes |
|---|---|---|
| Shopify Lite | ✓ | Buy buttons only |
| Basic Shopify | ✓ | Full features |
| Shopify | ✓ | Full features |
| Advanced Shopify | ✓ | Full features |
| Shopify Plus | ✓ | Full features + advanced options |
Installation
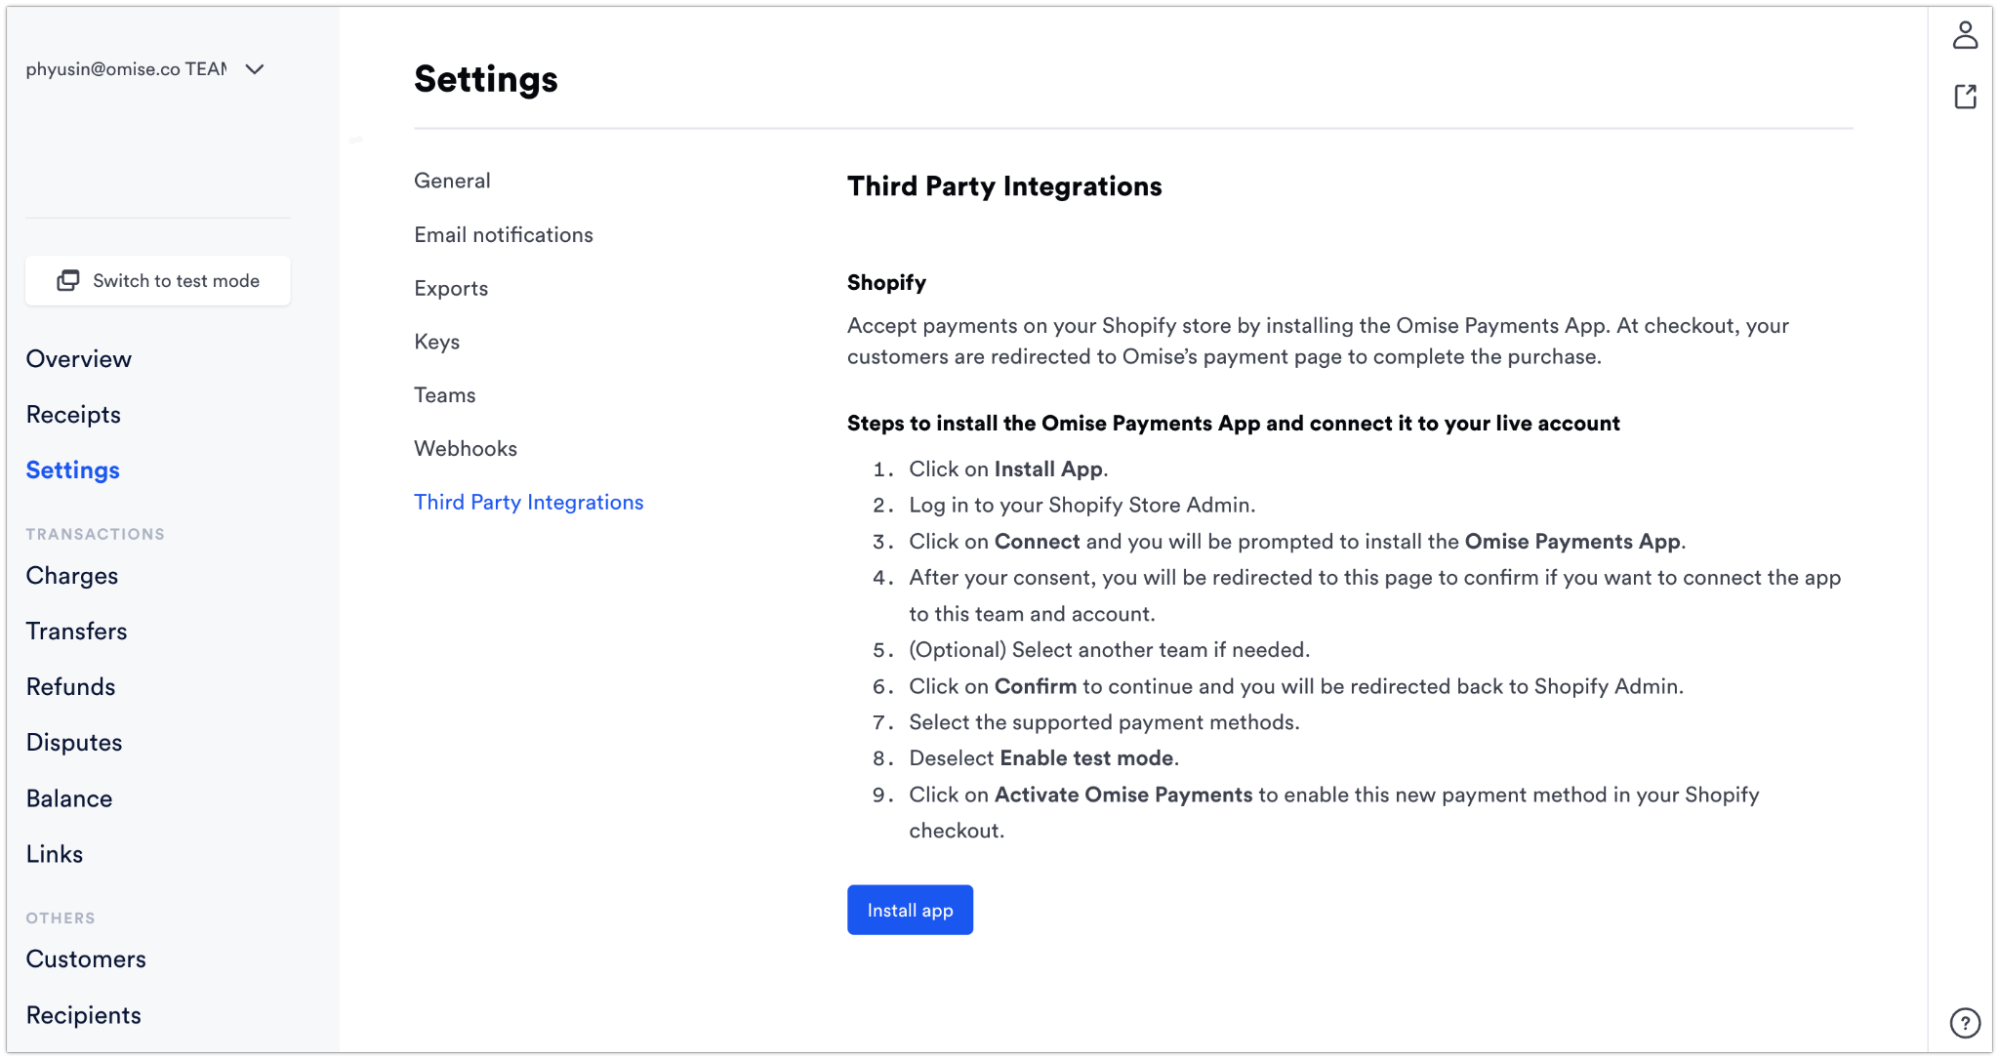
Step 1: Install from Shopify App Store
- Access Shopify App Store
- Log in to your Shopify admin
- Navigate to Apps in left sidebar
- Click Customize your store
- Search for "Omise Payment Gateway"

- Install the App
- Click on Omise Payment Gateway app
- Review app permissions
- Click Add app
- Confirm installation
App Permissions:
Omise requests access to:
✓ View and modify orders
✓ View and modify customers
✓ View store settings
✓ Process payments
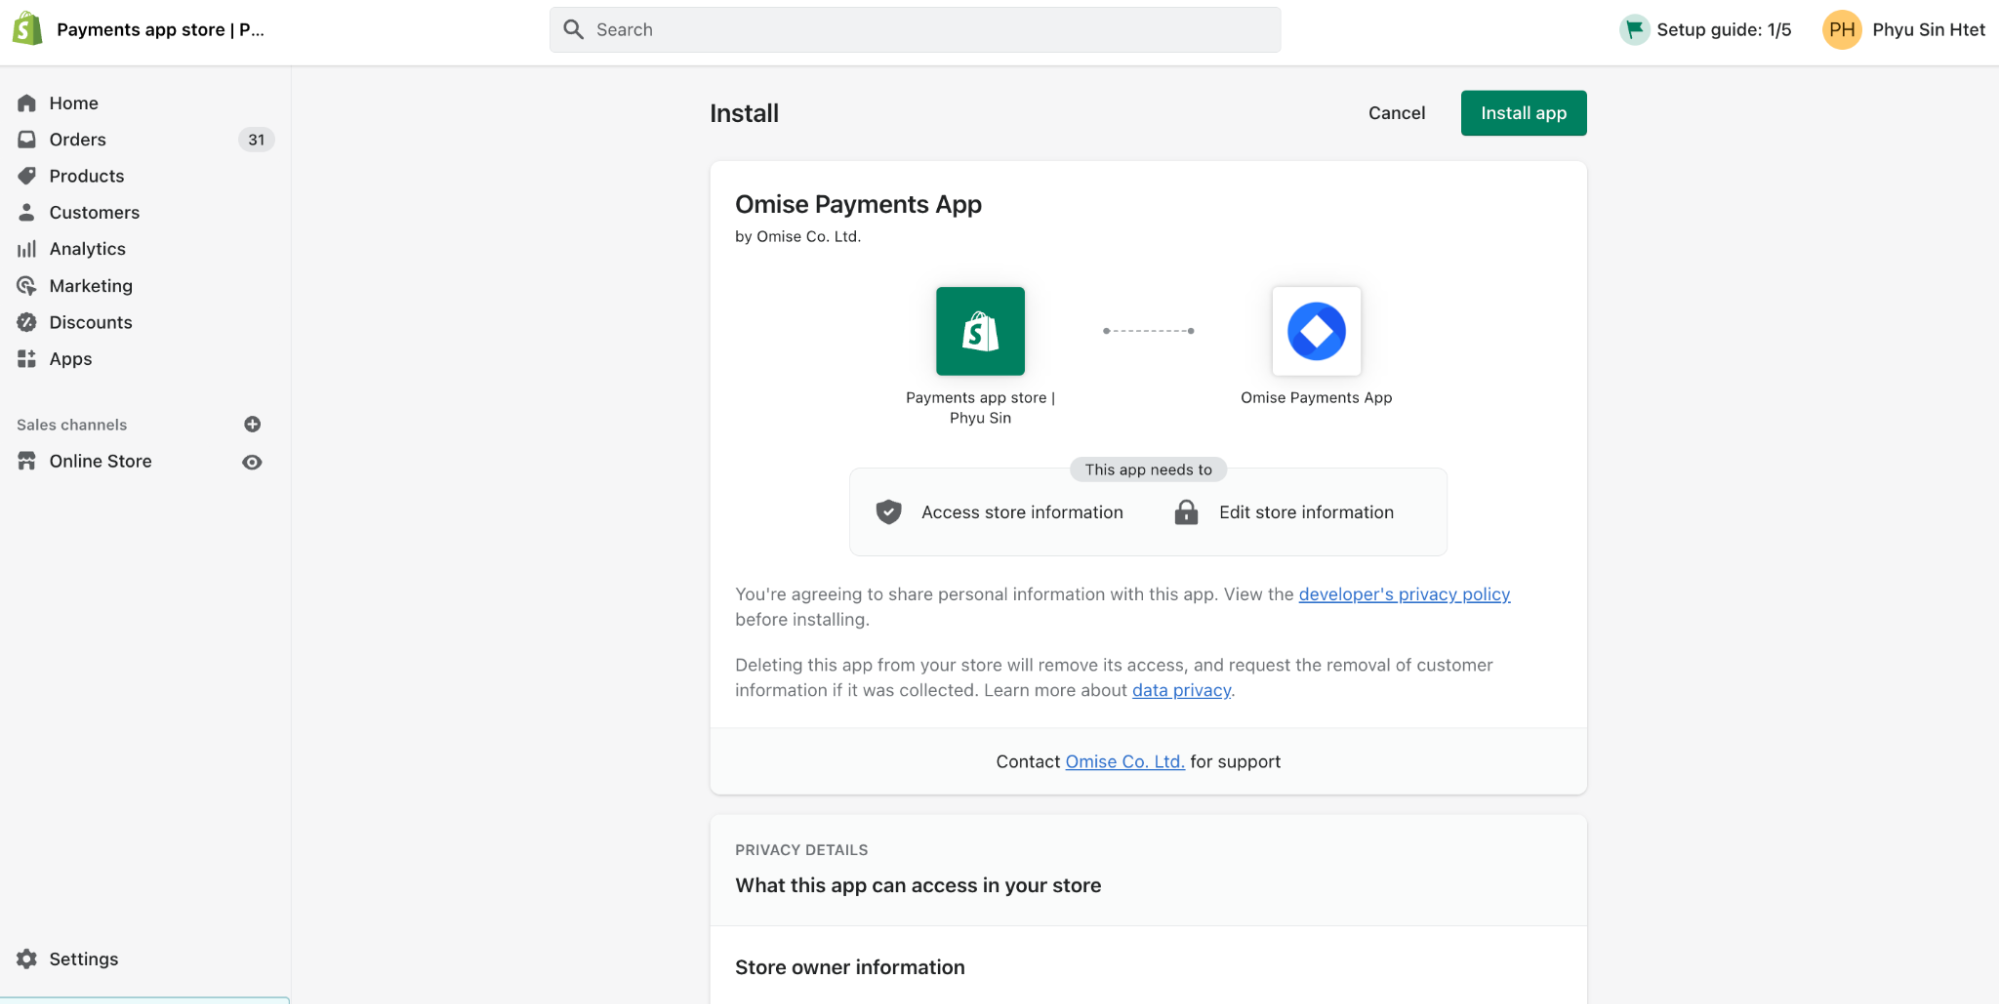
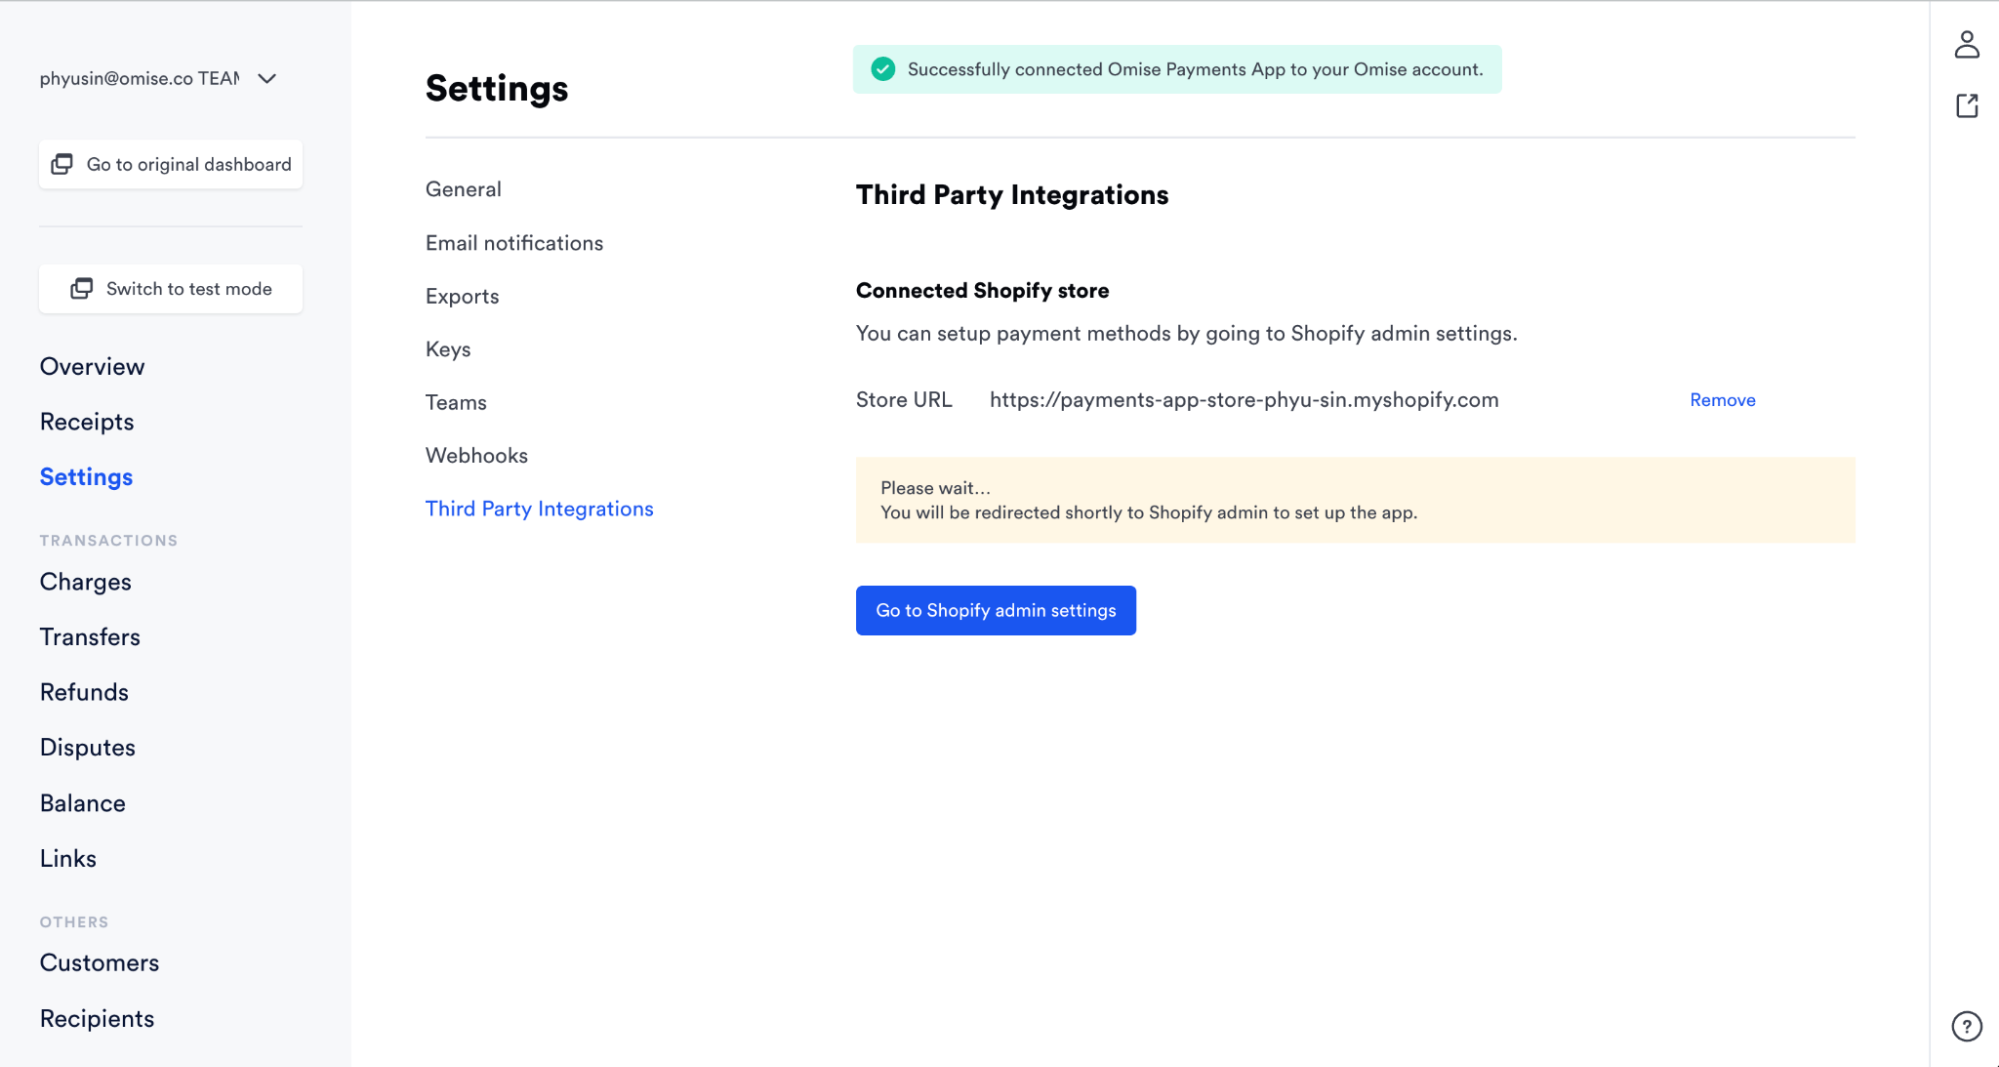
- Complete Installation
- Wait for installation to complete
- You'll be redirected to Omise settings
- Installation typically takes 30-60 seconds
Step 2: Configure API Keys
- Get Your API Keys
- Open new tab, go to Omise Dashboard
- Navigate to Settings → Keys
- Copy your Public Key (starts with
pkey_) - Copy your Secret Key (starts with
skey_)
Test Keys (for testing):
Public Key: pkey_test_5xyzabc123
Secret Key: skey_test_5xyzabc456

Live Keys (for production):
Public Key: pkey_live_5xyzabc789
Secret Key: skey_live_5xyzabc012
- Enter Keys in Shopify
- Return to Shopify admin
- In Omise app settings:
- Paste Public Key in Public Key field
- Paste Secret Key in Secret Key field
- Select Test Mode for testing
- Click Save
Step 3: Enable Payment Methods
-
Navigate to Payment Settings
- Still in Omise app settings
- Scroll to Payment Methods section
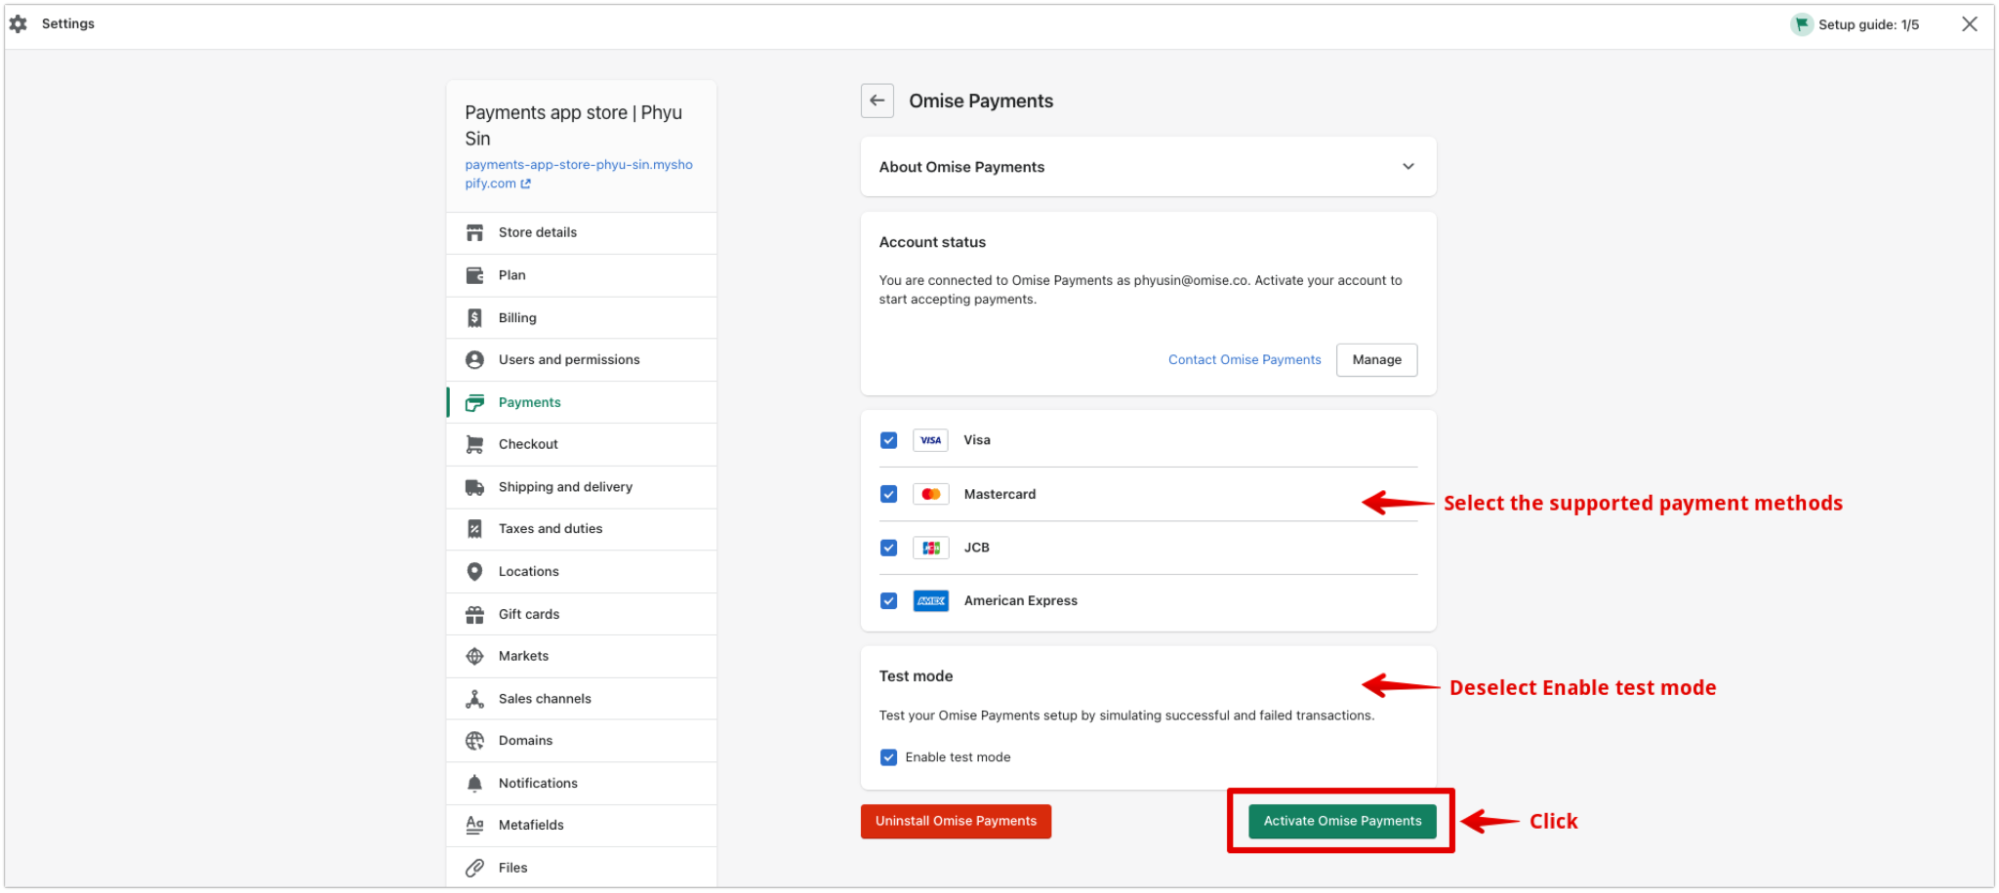
-
Select Payment Methods
Credit/Debit Cards:
✓ Enable card payments
✓ Enable 3D Secure (recommended)
✓ Set capture mode: Automatic

Supported: Visa, Mastercard, Amex, JCB
Fee: 3.65% per transaction
Internet Banking:
✓ Enable internet banking
✓ Select banks:
  - Bangkok Bank
  - Kasikorn Bank
  - Siam Commercial Bank
  - Krung Thai Bank
  - All other major banks

Fee: THB 15 per transaction
E-Wallets:
✓ TrueMoney Wallet
✓ Rabbit LINE Pay
✓ ShopeePay
✓ Alipay (for Chinese customers)
✓ WeChat Pay (for Chinese customers)

Fee: 2.9% - 3.65% per transaction
Installments:
✓ Enable installments
✓ Minimum amount: THB 3,000
✓ Available terms:
  - 3 months (0%)
  - 6 months (0%)
  - 10 months (0%)

Fee: Higher rates apply
- Configure Payment Method Settings
Card Payment Settings:
Payment Capture: Automatic (recommended)
  - Captures payment immediately
  - Funds reserved for settlement

3D Secure: Enabled (recommended)
  - Additional security layer
  - Required for some cards
  - Reduces fraud risk

Failed Card Retry: Enabled
  - Allows customer to retry with different card
  - Shows helpful error messages
Step 4: Configure Webhook
Webhooks keep order status synchronized:
- Copy Webhook URL
- In Omise app settings
- Find Webhook URL section
- Copy the provided URL
Example Webhook URL:
https://yourstore.myshopify.com/apps/omise/webhook
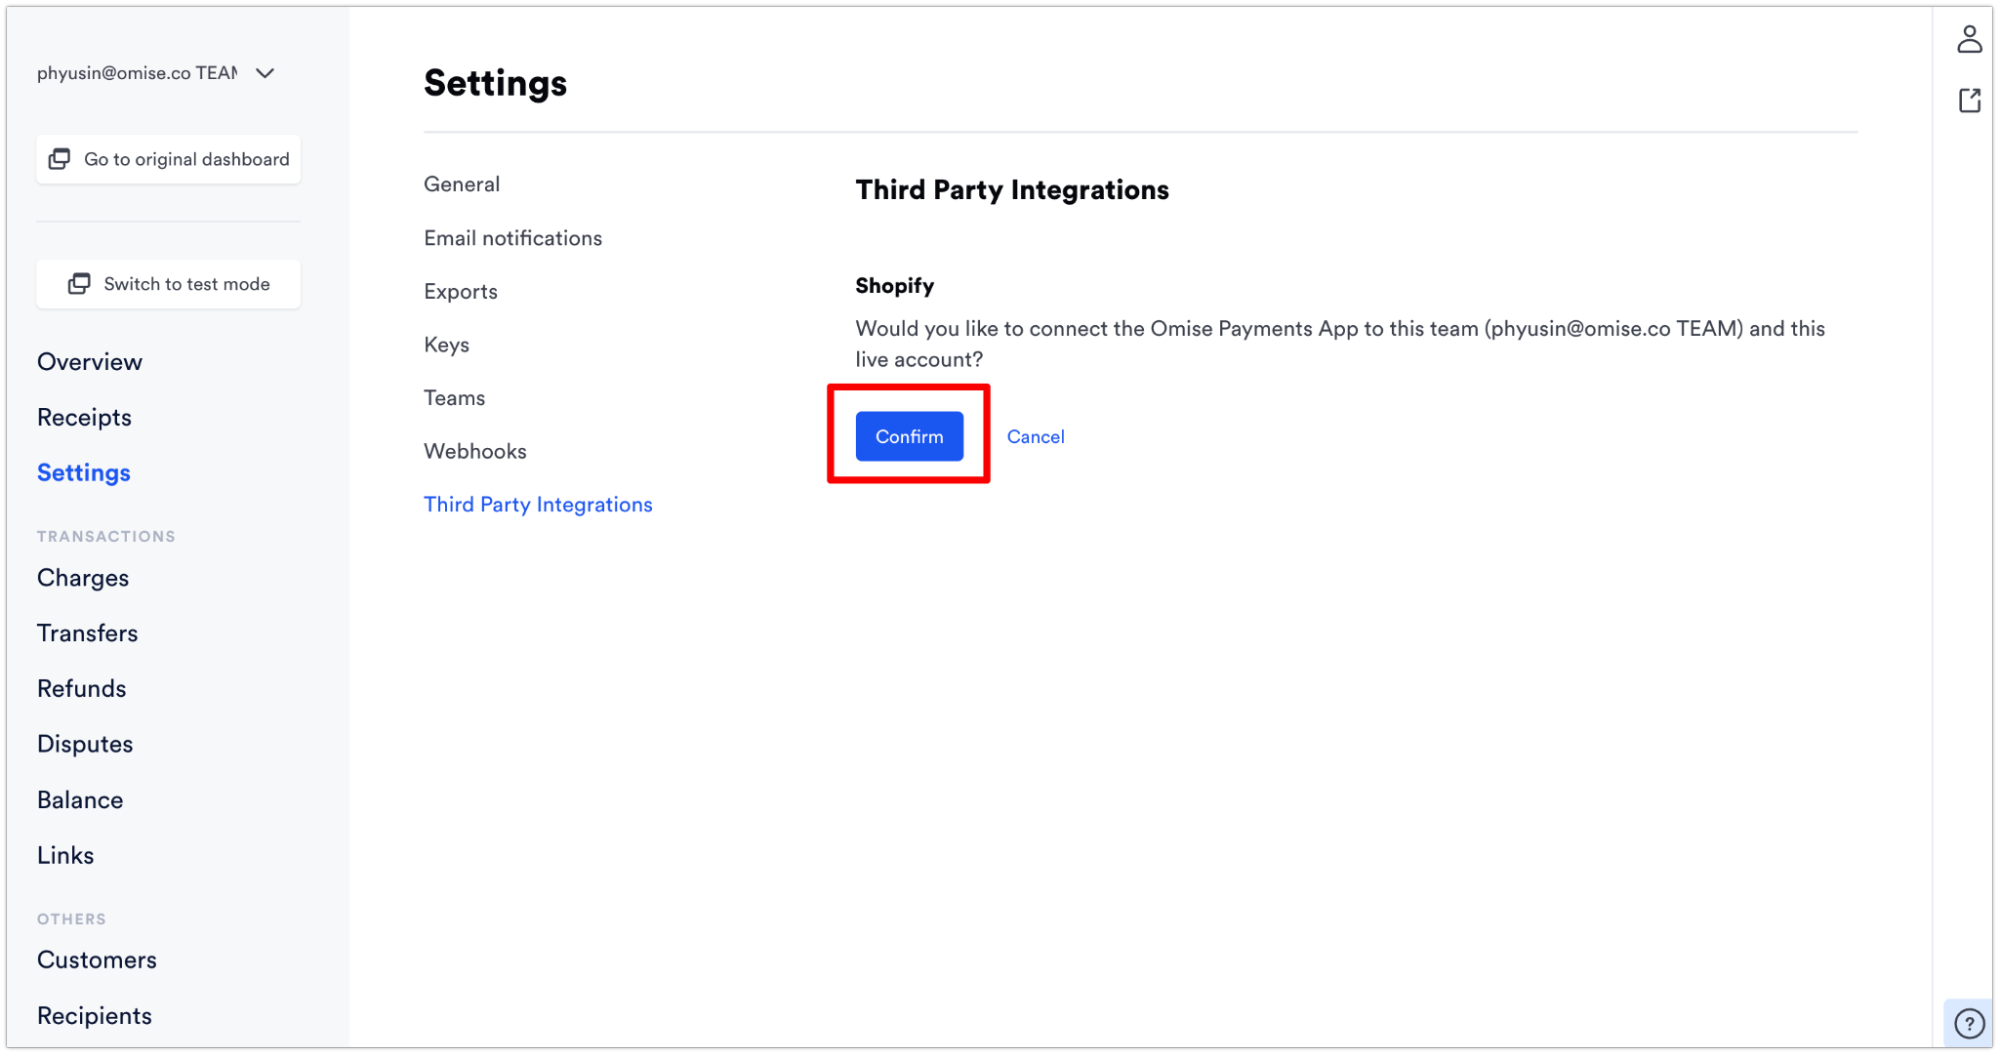
-
Add to Omise Dashboard
- Go to Omise Dashboard
- Navigate to Settings → Webhooks
- Click Add Webhook
- Paste webhook URL
- Select events:
- charge.complete
- charge.failed
- refund.create
- Click Create
-
Test Webhook
- In Omise Dashboard, click Send Test
- Check Shopify logs for webhook receipt
- Verify test event received successfully
Step 5: Test the Integration
Before going live, thoroughly test:
-
Create Test Order
- Visit your Shopify storefront
- Add product to cart
- Proceed to checkout
- Complete customer information
-
Test Card Payment
- Select credit card payment
- Use test card details:
Card Number: 4242 4242 4242 4242
Expiry Date: 12/28
CVV: 123
Name: Test Customer- Complete payment
- Verify order created in Shopify
- Check order status updated to "Paid"
-
Test Other Payment Methods
- Test internet banking (redirects to test page)
- Test e-wallet payments
- Test installment payments
- Verify all methods work correctly
-
Test Order Flow
- Check order confirmation email
- Verify inventory deduction
- Test customer account updates
- Review transaction in Omise Dashboard
Step 6: Go Live
Once testing is complete:
-
Switch to Live Mode
- In Omise app settings
- Replace test keys with live keys:
- Public Key:
pkey_live_xxx - Secret Key:
skey_live_xxx
- Public Key:
- Disable Test Mode
- Click Save
-
Verify Live Settings
- Check payment methods are enabled
- Verify webhook URL is correct
- Confirm all settings saved
-
Monitor First Transactions
- Watch first few live orders closely
- Verify payments processing correctly
- Check order status updates
- Confirm webhook delivery
Shopify Admin Features
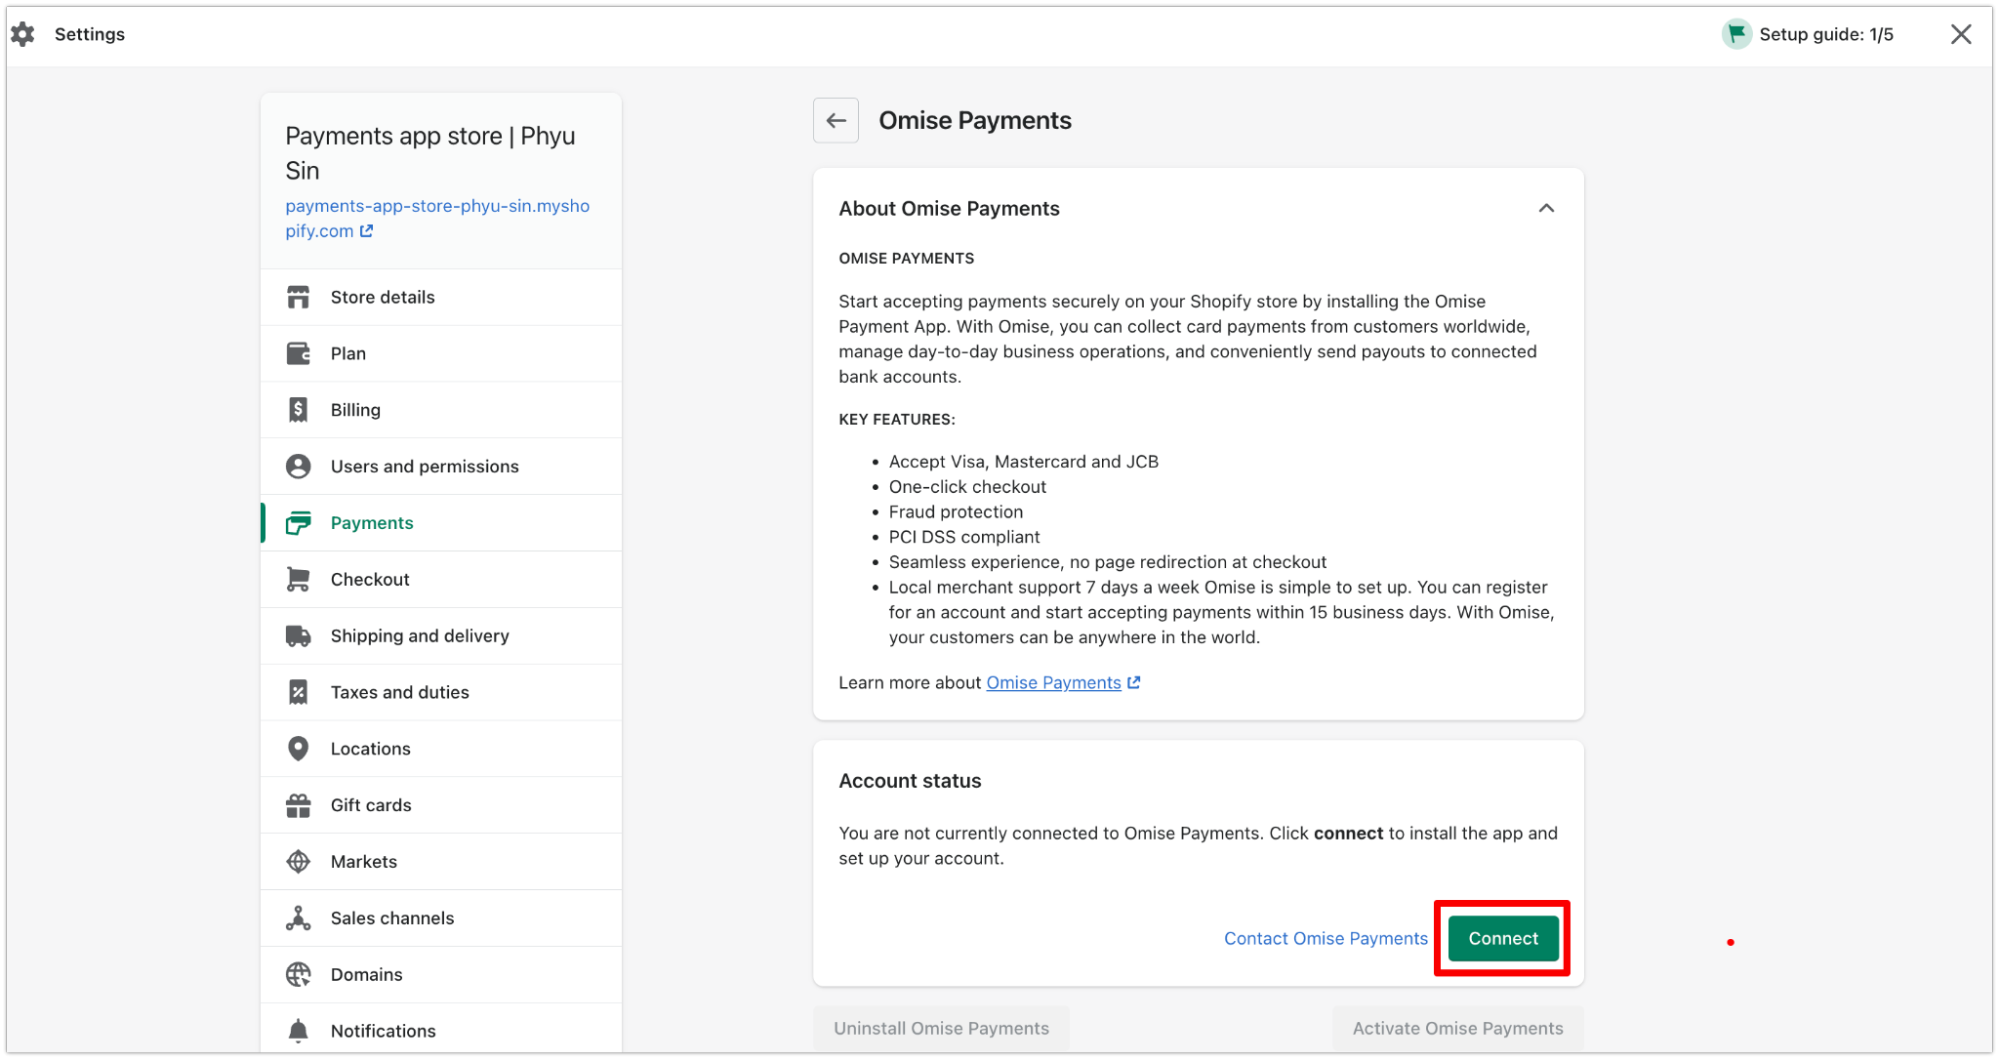
Payment Gateway Settings
Access through: Settings → Payments → Omise Payment Gateway
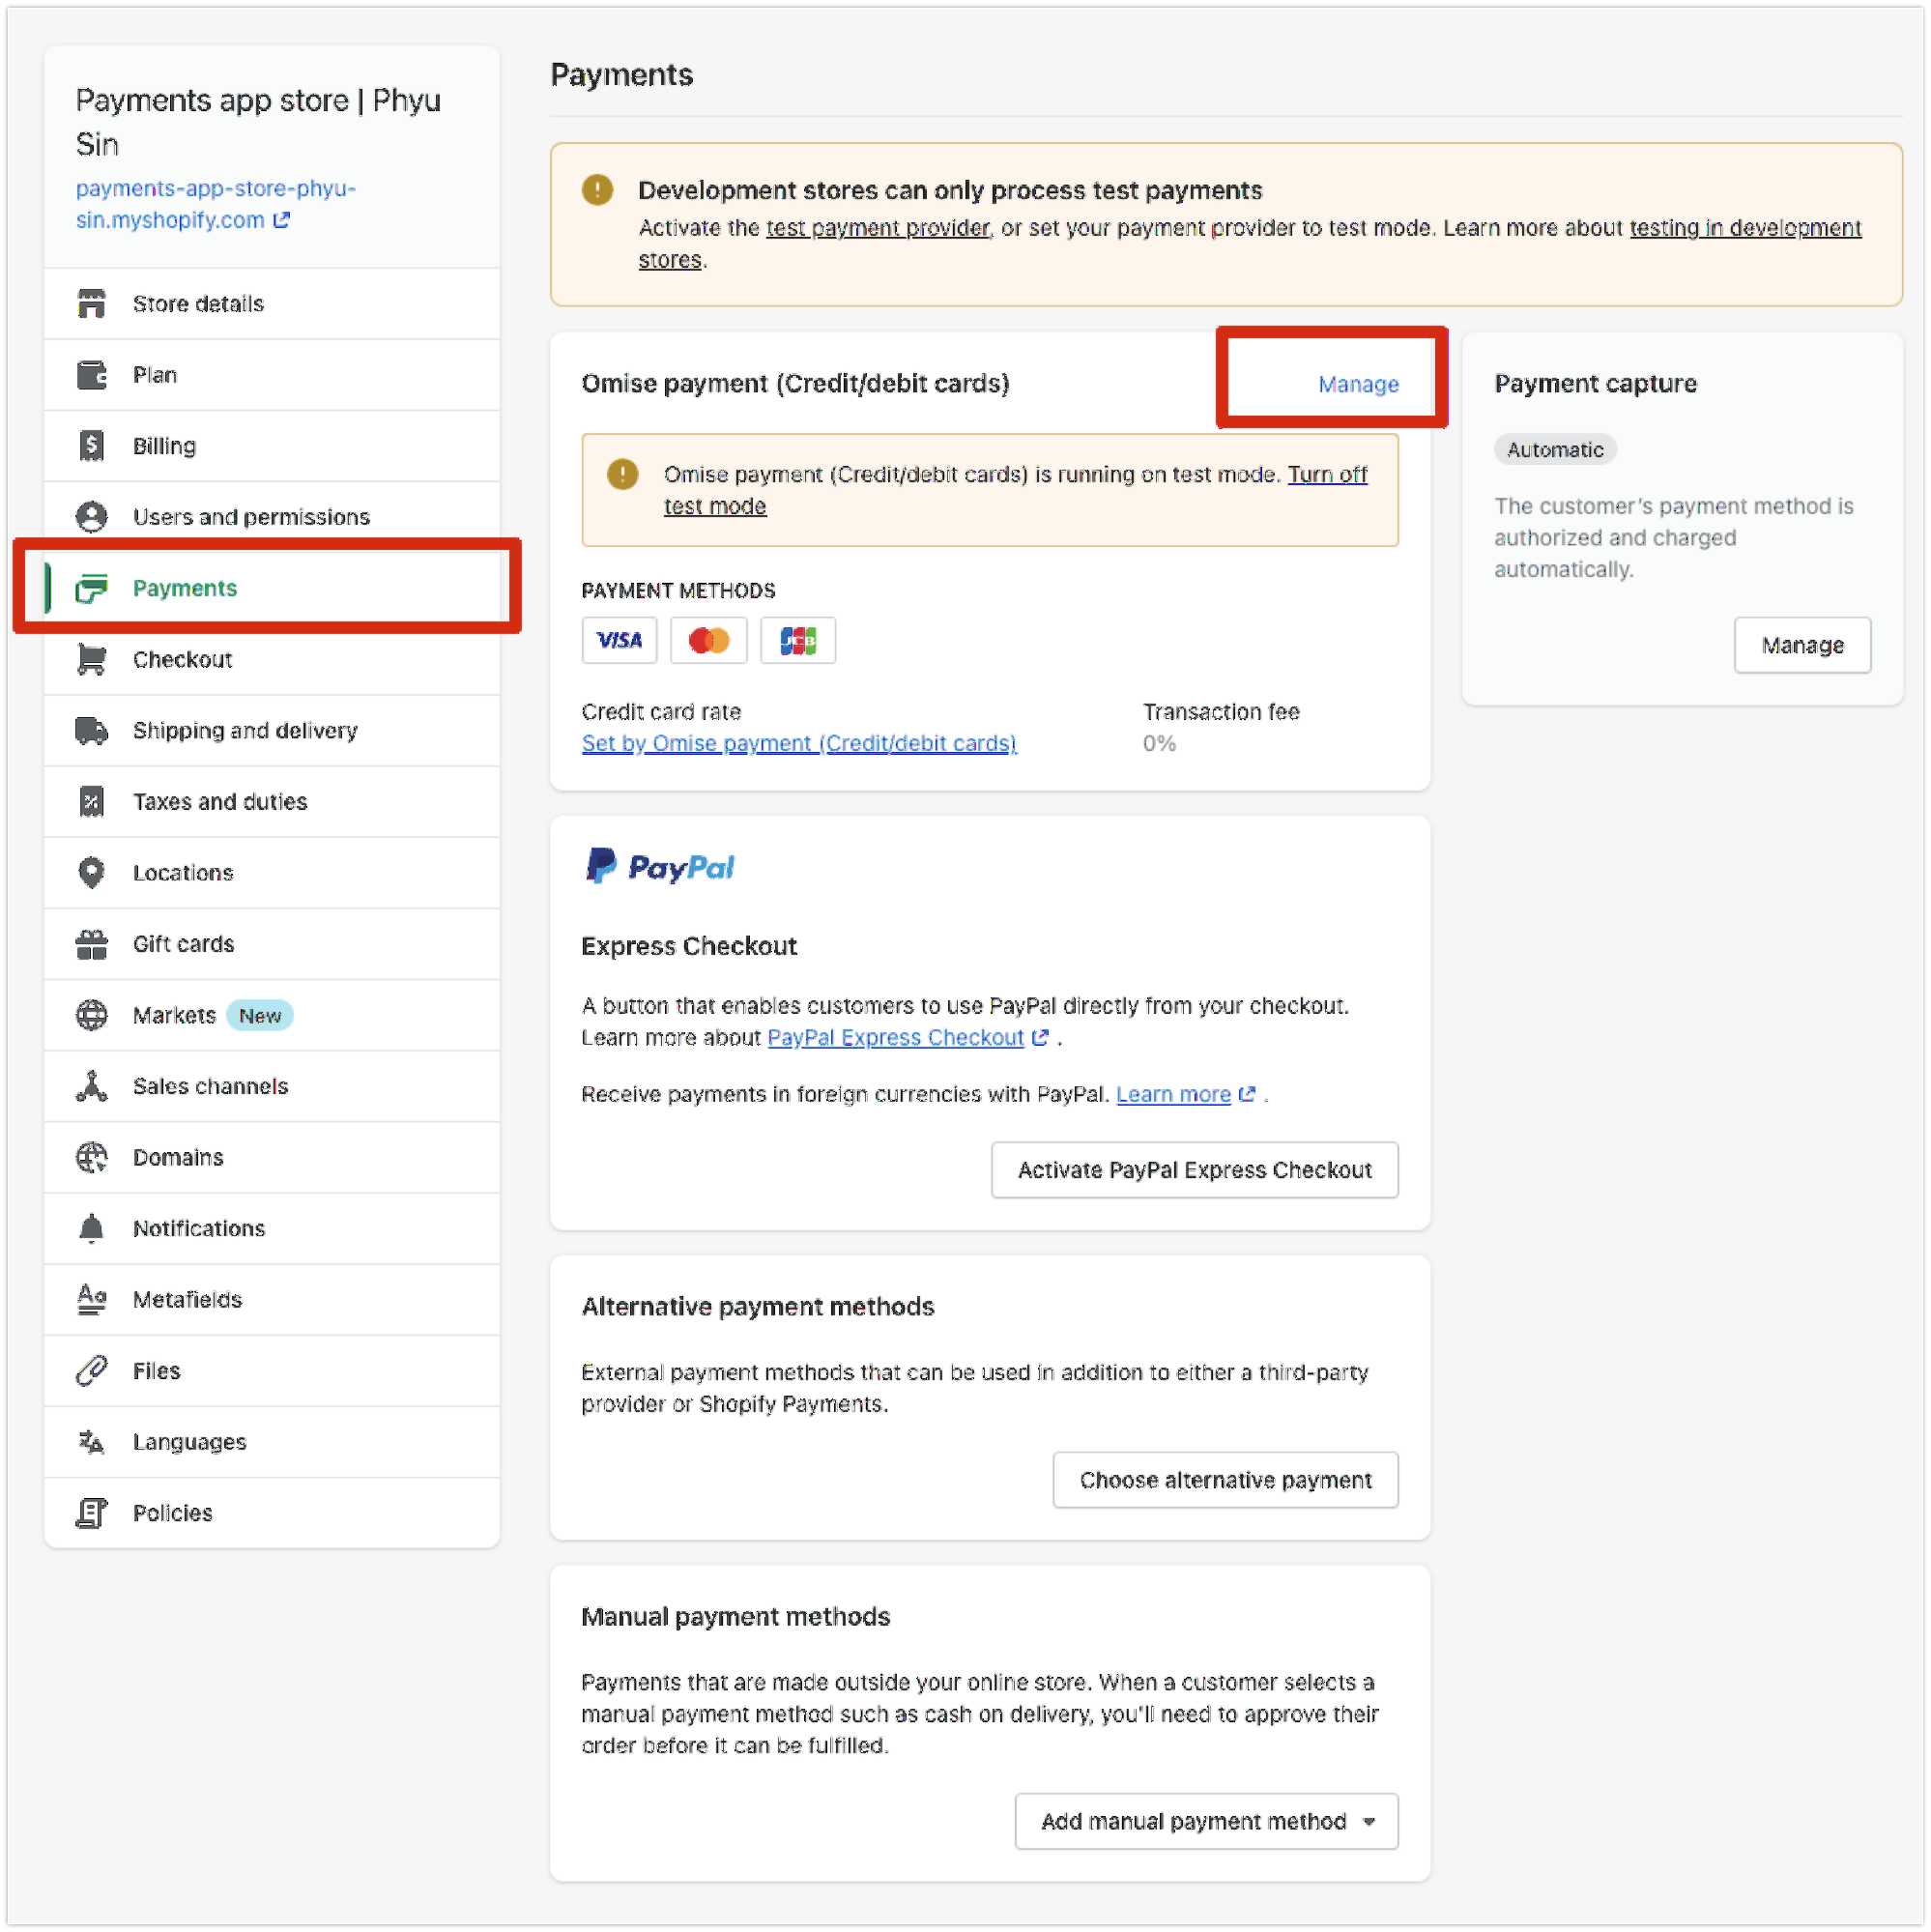
Available Settings:
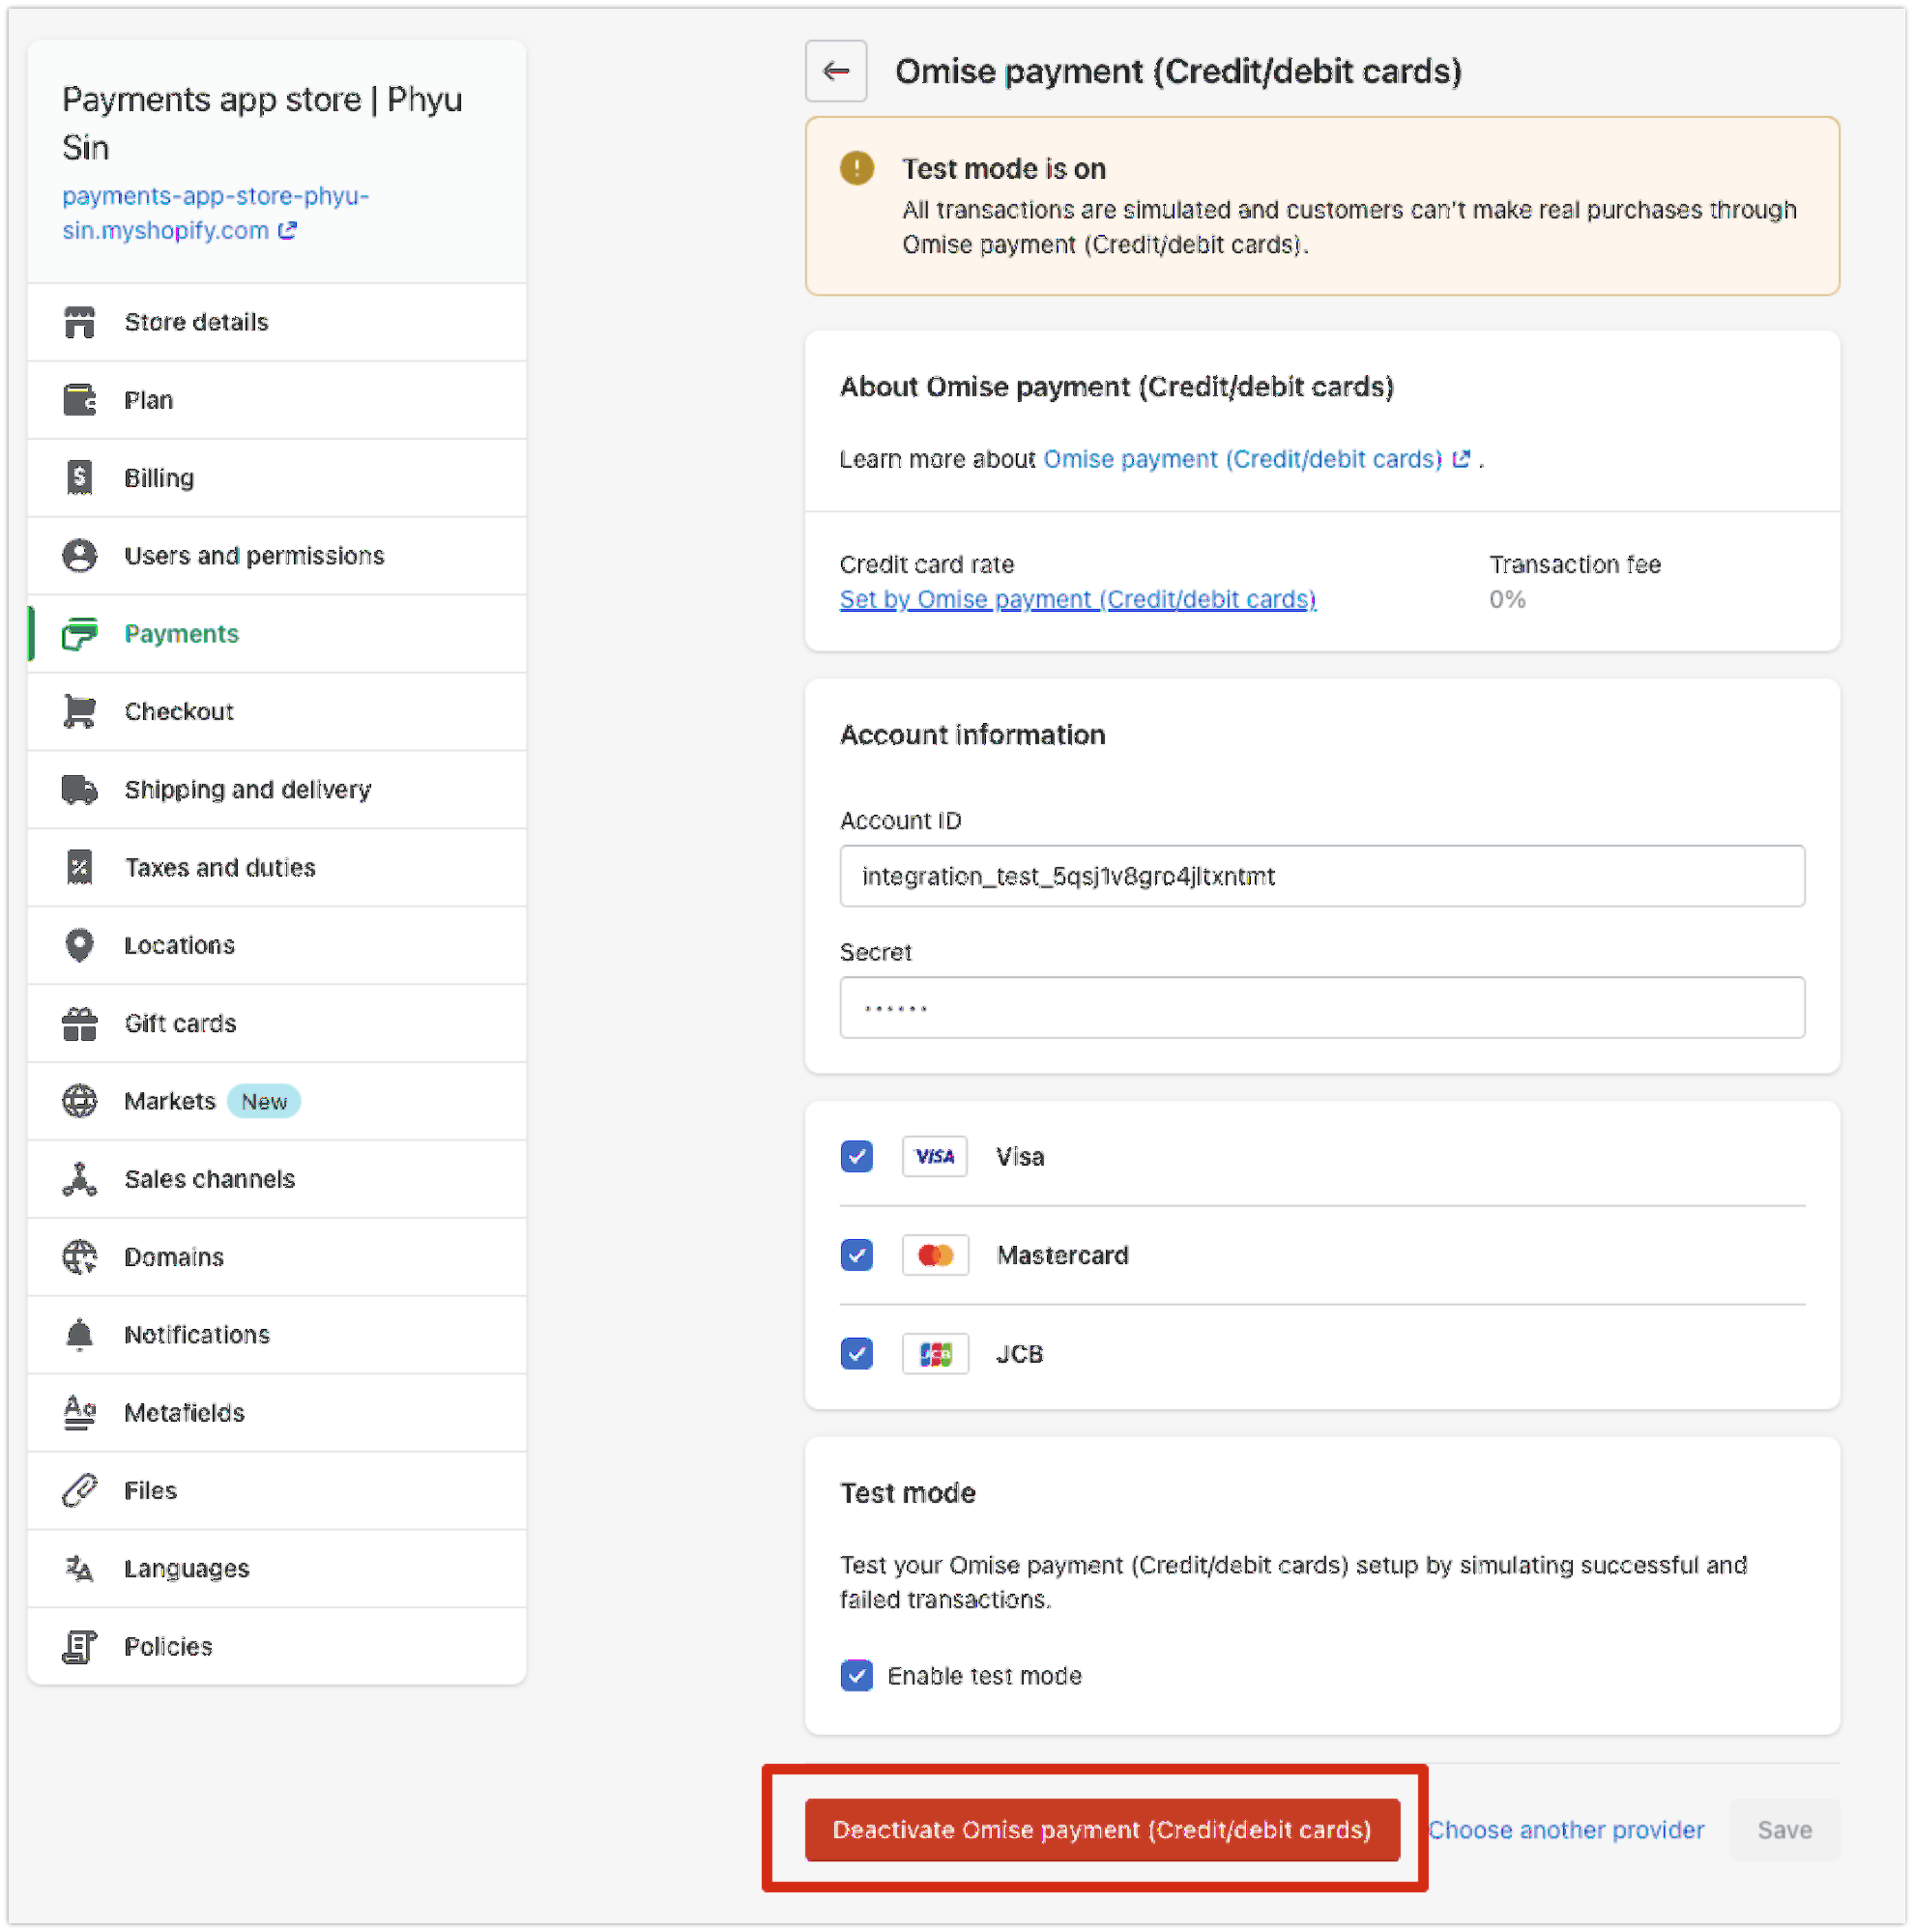
General:
- API Keys (test and live)
- Environment (test/live mode)
- Enable/disable payment methods

Card Payments:
- 3D Secure (on/off)
- Payment capture (auto/manual)
- Save cards for customers

Display:
- Payment method order
- Custom payment icons
- Checkout button text

Advanced:
- Webhook configuration
- Debug logging
- Custom CSS
- Order status mapping
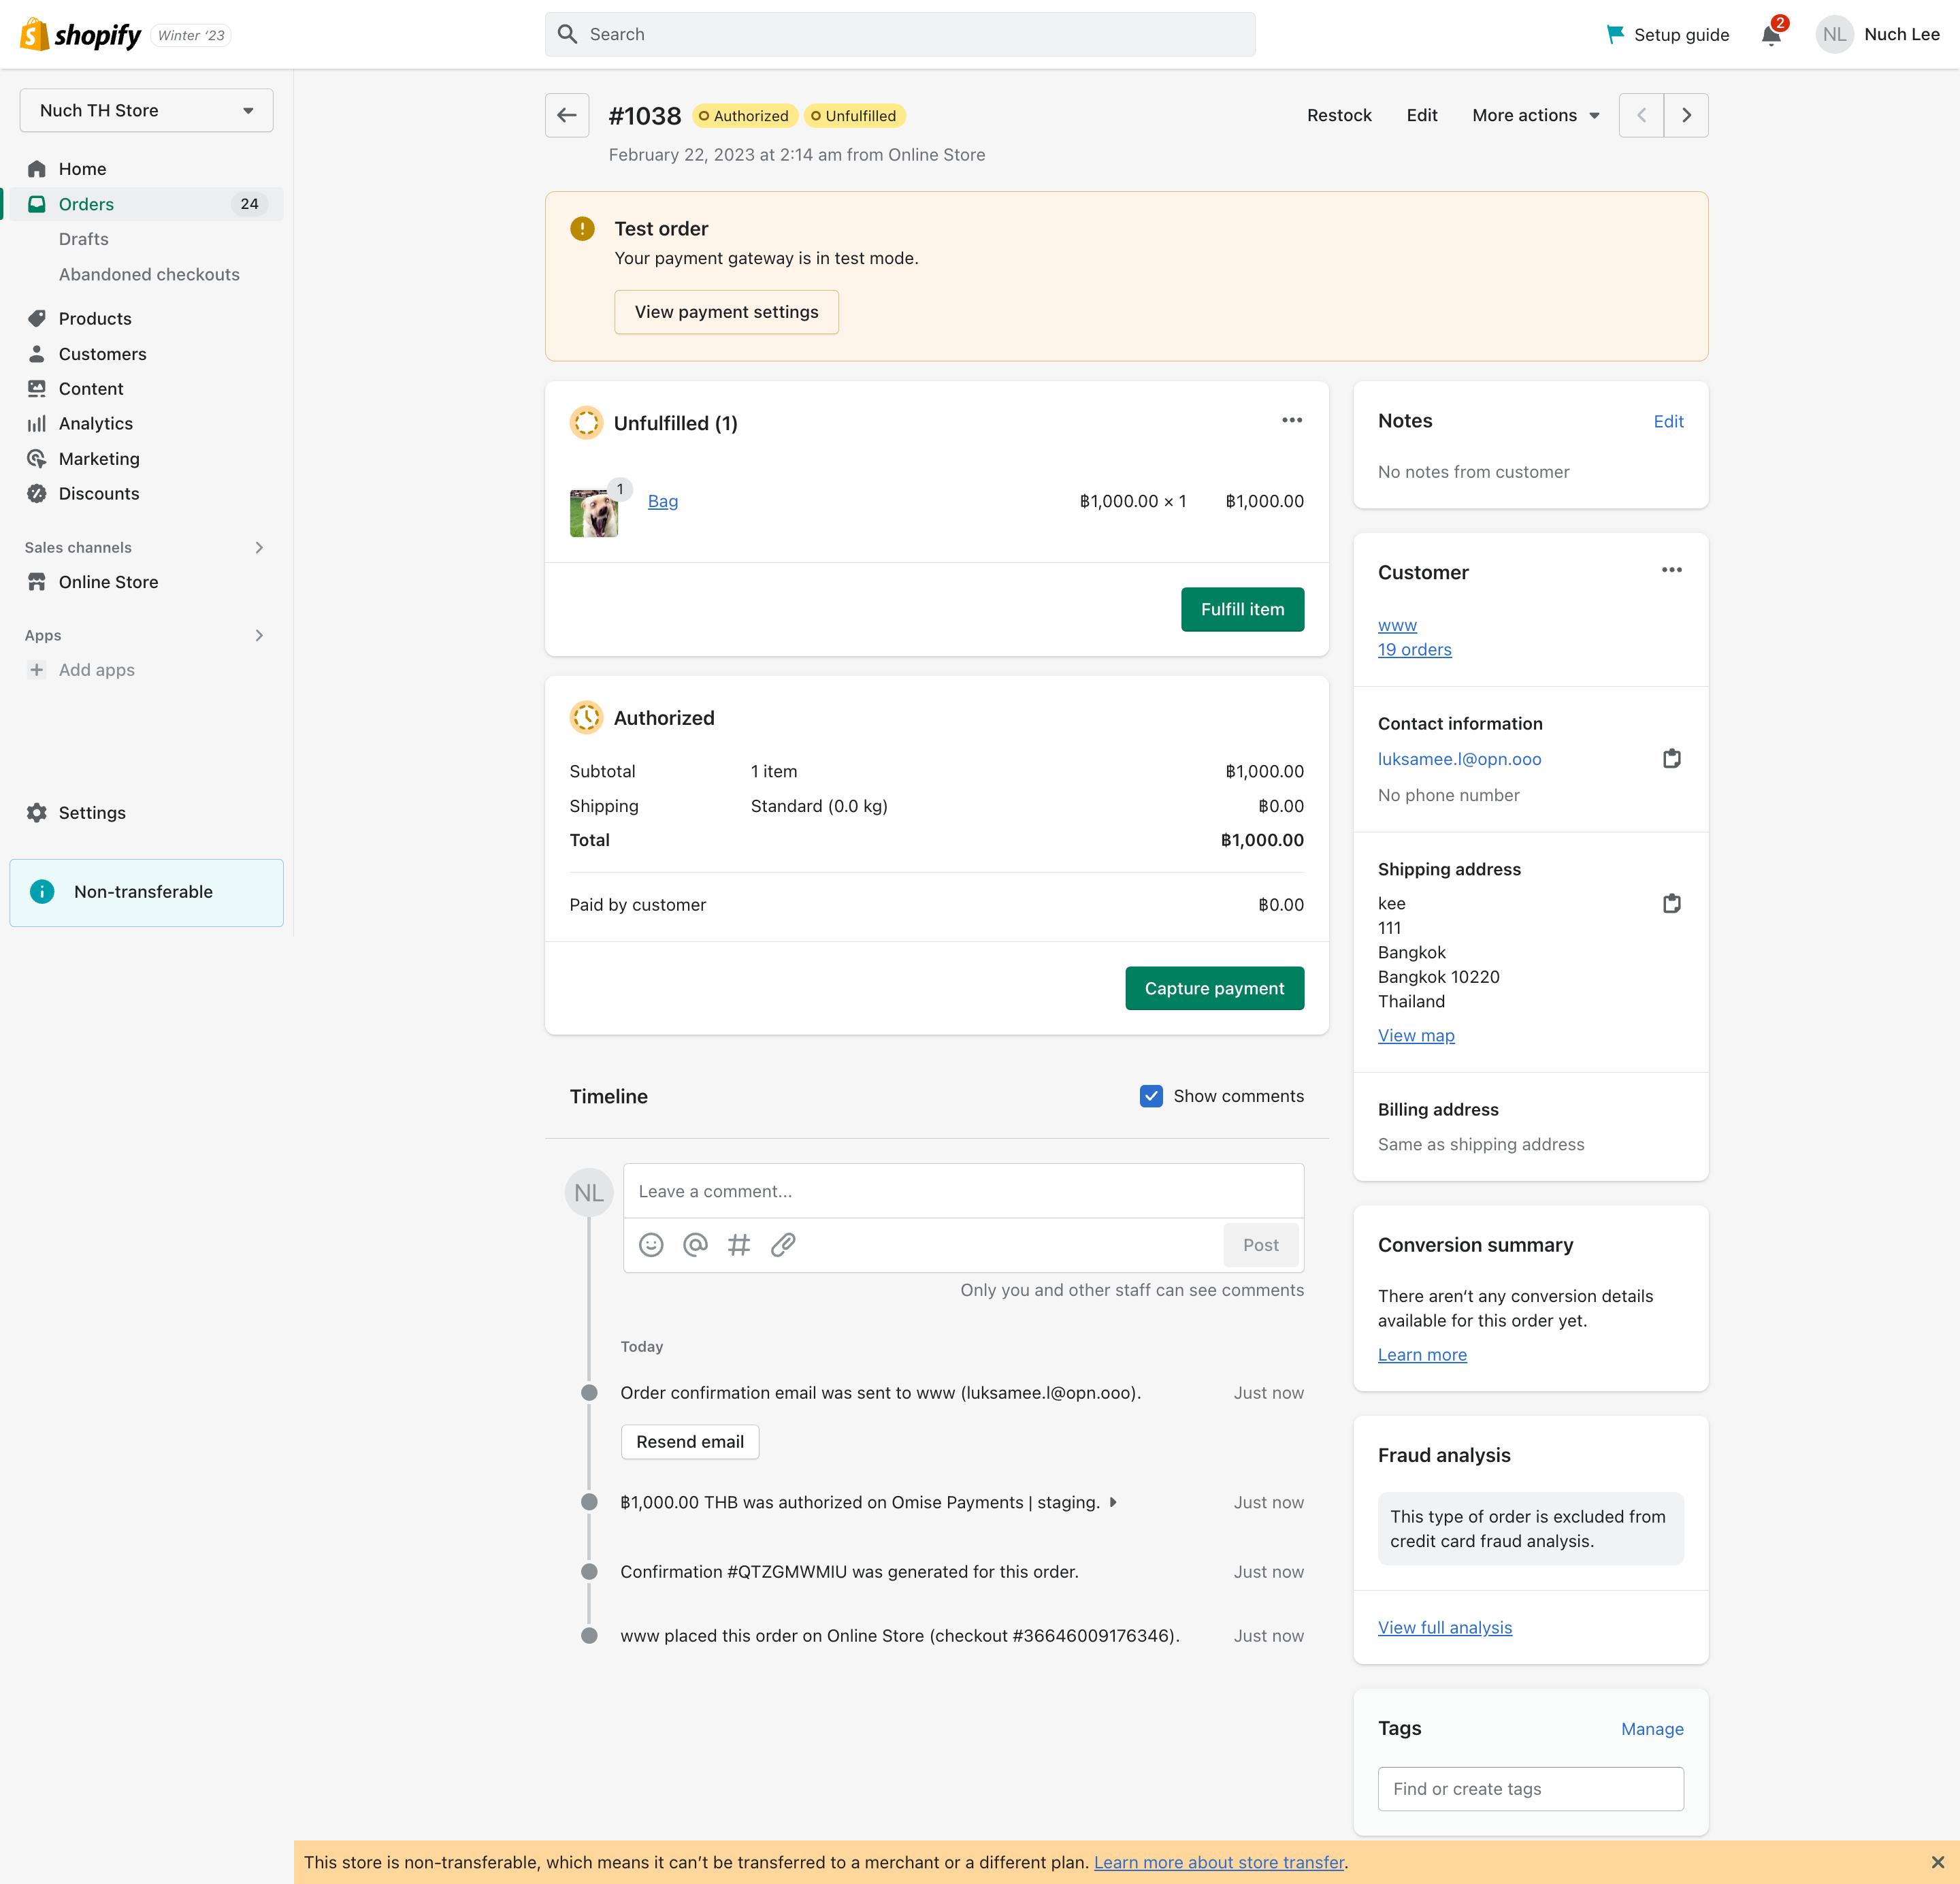
Order Management
Order Status Flow:
Customer places order → Pending
Payment processing → Processing Payment
Payment successful → Paid
Payment failed → Payment Failed
Refund issued → Refunded (partial/full)
Order Actions:
-
View Payment Details
- Click on order
- Scroll to Payment section
- See Omise charge ID
- View payment method used
- Check transaction status
-
Issue Refunds
- Open order
- Click Refund
- Select refund type:
- Full refund
- Partial refund
- Item refund
- Enter reason (optional)
- Click Refund
-
View Transaction History
- Payment timeline
- Refund history
- Webhook events
- Customer payment actions
Payment Methods Configuration
Credit Card Payments
Setup:
1. Enable card payments in settings
2. Turn on 3D Secure for security
3. Set automatic capture
4. Enable card saving (optional)
Customer Experience:
- Customer enters card details directly on checkout
- 3D Secure popup if required
- Instant payment confirmation
- Receipt emailed automatically
Card Types Supported:
- Visa (debit and credit)
- Mastercard (debit and credit)
- American Express
- JCB
Internet Banking
Setup:
1. Enable internet banking
2. Select supported banks (or all)
3. Configure redirect URLs
4. Set timeout (default: 30 minutes)
Customer Flow:
- Select internet banking
- Choose their bank
- Redirect to bank website
- Complete payment
- Return to store automatically
Supported Banks:
- Bangkok Bank (BBL)
- Kasikorn Bank (KBANK)
- Siam Commercial Bank (SCB)
- Krung Thai Bank (KTB)
- Bank of Ayudhya (BAY)
- TMB Bank (TMB)
- All other Thai commercial banks
E-Wallets
TrueMoney Wallet:
Enable: ✓
Display Name: "TrueMoney Wallet"
Icon: TrueMoney logo
Flow: Redirect to TrueMoney app/web
Rabbit LINE Pay:
Enable: ✓
Display Name: "Rabbit LINE Pay"
Icon: Rabbit LINE Pay logo
Flow: Redirect to LINE app/web
ShopeePay:
Enable: ✓
Display Name: "ShopeePay"
Icon: ShopeePay logo
Flow: QR code or app redirect
Customer Experience:
- Select e-wallet at checkout
- Redirect to wallet app/website
- Approve payment in wallet
- Return to store automatically
- Instant confirmation
Installment Payments
Configuration:
Minimum Order Amount: THB 3,000
Available Terms:
- 3 months (0% interest)
- 6 months (0% interest)
- 10 months (0% interest)

Card Requirements:
- Thai-issued credit cards only
- Participating banks
- Customer must be eligible
Installment Display:
Product Page:
"Pay in installments starting from THB 1,000/month"

Checkout Page:
"Pay THB 3,000 in 3 installments of THB 1,000"
[Selection buttons: 3 months | 6 months | 10 months]
Customer Eligibility:
- Checked automatically with bank
- Displayed at checkout
- Customer selects preferred term
- Bank processes installment setup
Customization
Checkout Appearance
Payment Method Display:
<!-- Customize payment method order -->
1. Credit/Debit Cards
2. TrueMoney Wallet
3. Rabbit LINE Pay
4. Internet Banking
5. Installments
Custom Payment Icons:
Upload custom icons for:
- Payment method logos
- Security badges
- Trust seals

Recommended size: 120x40px
Format: PNG with transparency
Checkout Button Text:
Default: "Complete Order"
Customize to:
- "Pay Now"
- "Complete Payment"
- "Confirm and Pay"
- Custom text in Thai: "ชำระเงิน"
Custom CSS (Advanced)
Add custom styles to payment section:
/* Customize payment method buttons */
.omise-payment-method {
  border-radius: 8px;
  padding: 15px;
  margin: 10px 0;
  border: 2px solid #e0e0e0;
}

.omise-payment-method:hover {
  border-color: #FF5722;
  background: #fff5f3;
}

/* Customize selected payment method */
.omise-payment-method.selected {
  border-color: #FF5722;
  background: #fff;
  box-shadow: 0 2px 8px rgba(255,87,34,0.2);
}

/* Customize payment button */
.omise-pay-button {
  background: #FF5722;
  color: white;
  padding: 15px 40px;
  border-radius: 4px;
  font-weight: bold;
  border: none;
}
Multi-Currency Support
Currency Configuration
Setup Multi-Currency:
1. Enable multi-currency in Shopify settings
2. Add currencies you want to support
3. Configure exchange rates (auto or manual)
4. Set default currency

Supported by Omise:
- THB (Thai Baht)
- USD (US Dollar)
- EUR (Euro)
- GBP (British Pound)
- SGD (Singapore Dollar)
- JPY (Japanese Yen)
Currency Display:
Product prices shown in selected currency
Checkout processes in selected currency
Customer charged in selected currency
Settlement to merchant in configured currency
Exchange Rate Handling:
Option 1: Shopify Payments rates
Option 2: Manual rate setting
Option 3: Third-party app rates

Omise settles in:
- THB for Thailand merchants
- USD for international merchants
Advanced Features
Saved Cards
Allow customers to save cards for faster checkout:
Enable Saved Cards:
Settings → Omise Configuration
✓ Enable "Save cards for future purchases"
Customer Experience:
First Purchase:
□ Save this card for future purchases
  (Checkbox at checkout)

Returning Customer:
Saved Cards:
○ Visa ****1234 (Exp: 12/26)
○ Use a new card
Security:
- Cards tokenized by Omise
- No card data stored on your server
- PCI compliant tokenization
- Customer can delete saved cards
Manual Payment Capture
For pre-orders or custom workflows:
Setup:
Settings → Card Payments
Capture Mode: Manual

Workflow:
1. Customer places order
2. Payment authorized (not captured)
3. Merchant reviews order
4. Merchant manually captures payment
5. Order fulfilled
Use Cases:
- Pre-orders (capture when ready to ship)
- Custom/made-to-order items
- High-value items needing verification
- Fraud prevention review
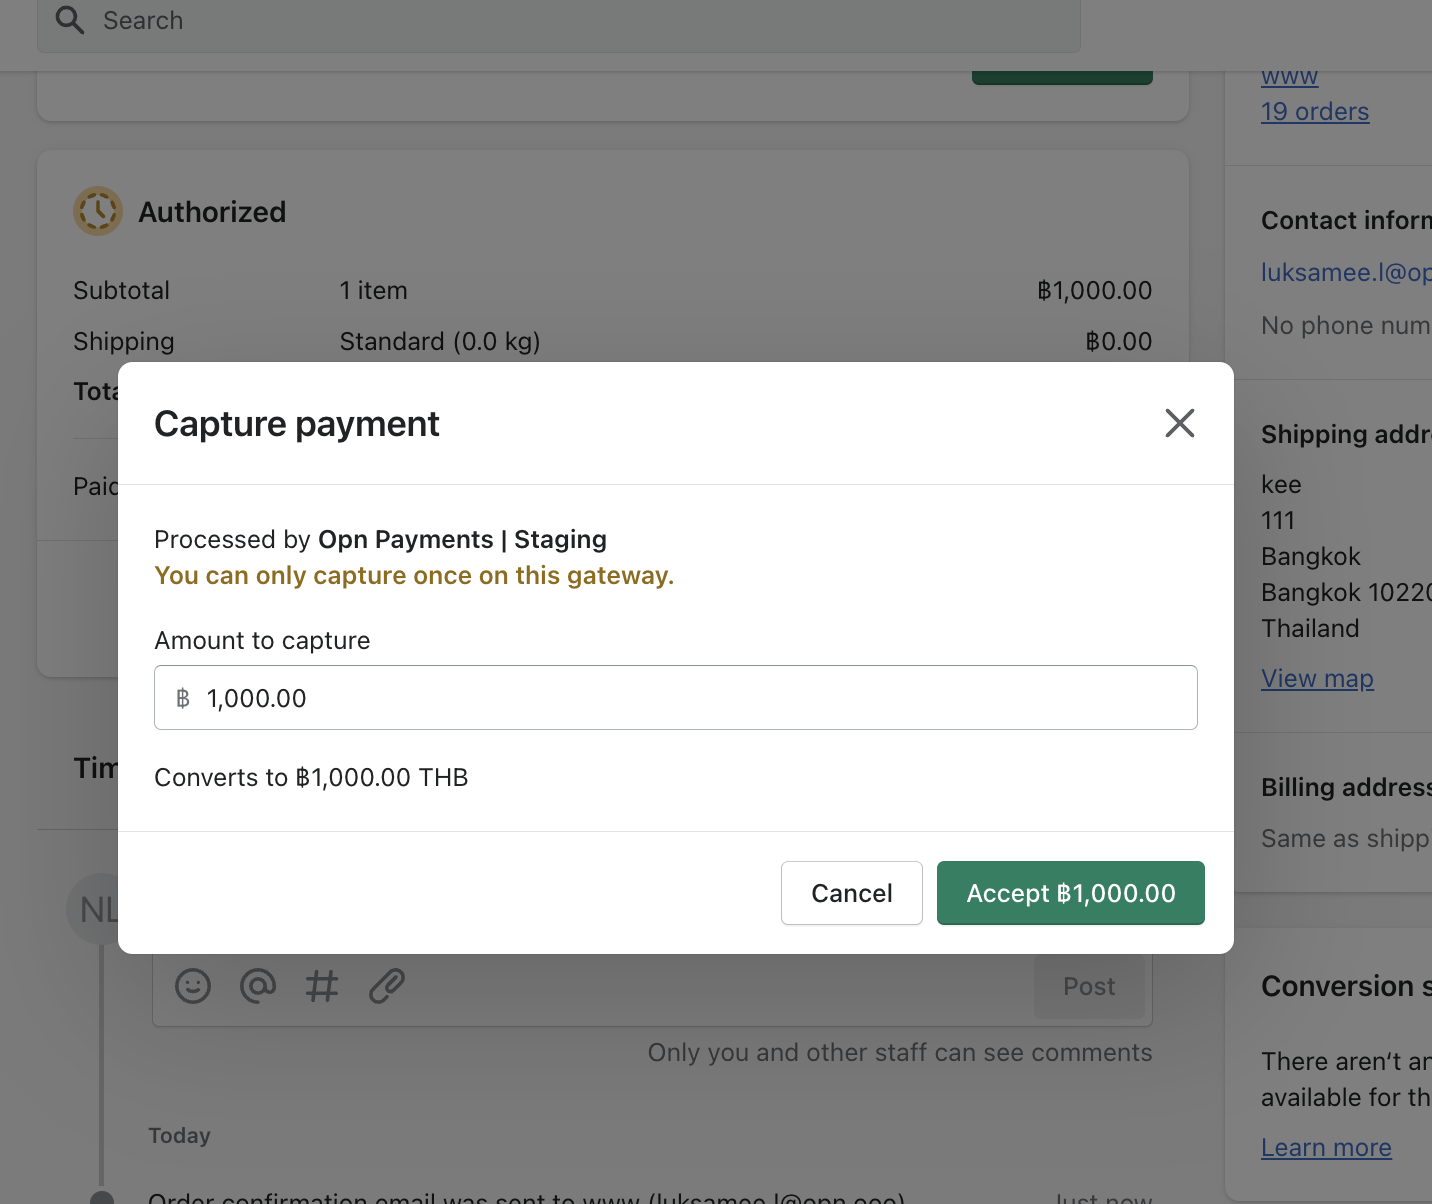
Manual Capture:
1. Open order in Shopify admin
2. Click "Capture Payment" button
3. Confirm capture
4. Payment processed
5. Order status updates

Authorization period: 7 days
(After 7 days, authorization expires)
Partial Payments
Split payments (Shopify Plus feature):
Example: THB 10,000 order

Payment 1 (Deposit): THB 3,000
- Customer pays 30% upfront
- Order marked as "Partially Paid"

Payment 2 (Balance): THB 7,000
- Send payment link for balance
- Customer completes payment
- Order marked as "Paid"
Shopify POS Integration
Accept Omise payments in-store:
Setup:
1. Enable Omise in POS settings
2. Configure payment methods for POS
3. Train staff on payment flow
4. Test with POS device
Supported Methods:
- Card payments (via terminal)
- QR code payments
- Mobile wallet payments
POS Flow:
1. Staff creates order in POS
2. Selects Omise payment
3. Customer pays via:
   - Card reader
   - QR code scan
   - Wallet app
4. Payment confirmed
5. Receipt printed/emailed
Troubleshooting
Common Issues
Issue: "Invalid API keys" error
Problem: Keys are incorrect or don't match environment
Solution:
1. Verify keys copied correctly (no extra spaces)
2. Ensure using correct keys for environment:
   - Test keys for test mode
   - Live keys for live mode
3. Check keys haven't been rotated
4. Generate new keys if needed
Issue: Payment methods not showing
Problem: Methods not enabled or configured
Solution:
1. Check methods enabled in Omise Dashboard
2. Verify currency supported by method
3. Ensure account verified for live methods
4. Check method-specific requirements
5. Clear browser cache and test
Issue: Orders not updating status
Problem: Webhook not configured or not working
Solution:
1. Verify webhook URL in Omise Dashboard
2. Check webhook endpoint is accessible
3. Test webhook using test event
4. Check Shopify app logs
5. Ensure no firewall blocking
Issue: 3D Secure popup blocked
Problem: Browser blocking authentication popup
Solution:
1. Enable popups for checkout domain
2. Configure popup exception
3. Try different browser
4. Check browser extensions not blocking
Issue: Refund failing
Problem: Refund not supported or timed out
Solution:
1. Check payment method supports refunds
2. Verify within refund window
3. Ensure sufficient settlement balance
4. Try smaller refund amount
5. Contact support if needed
Debugging
Enable Debug Logging:
Settings → Advanced → Debug Mode
✓ Enable debug logging

Logs location:
Shopify Admin → Apps → Omise → Logs

Information logged:
- API requests/responses
- Webhook events
- Error messages
- Payment flow events
Test Mode Benefits:
✓ No real charges made
✓ Test all payment flows safely
✓ Verify order processing
✓ Test webhook delivery
✓ Troubleshoot issues
Best Practices
Before Going Live
✓ Test all payment methods
✓ Verify order status updates
✓ Test refund process
✓ Check email notifications
✓ Review checkout flow
✓ Test on mobile devices
✓ Verify webhook working
✓ Review transaction fees
✓ Test failed payment handling
✓ Confirm customer experience
Security
✓ Use HTTPS only (standard with Shopify)
✓ Enable 3D Secure for cards
✓ Keep plugin updated
✓ Use strong Shopify passwords
✓ Enable 2FA on Shopify account
✓ Regularly review API key access
✓ Monitor for suspicious activity
✓ Follow PCI compliance guidelines
Performance
✓ Optimize checkout page
✓ Minimize checkout fields
✓ Enable Shopify CDN
✓ Use optimized payment icons
✓ Test checkout speed
✓ Monitor payment success rate
Customer Experience
✓ Offer multiple payment methods
✓ Display payment icons clearly
✓ Show security badges
✓ Provide payment instructions
✓ Send confirmation emails
✓ Have support contact visible
✓ Test mobile checkout thoroughly
FAQ
Do I need a Shopify Payments account?
No, Omise replaces Shopify Payments. You can use Omise as your sole payment gateway.
Can I use Omise with Shopify Payments?
Yes, you can offer both options to customers. They'll choose at checkout.
What Shopify plan do I need?
Basic Shopify or higher. Shopify Lite supports limited features (buy buttons only).
Are there additional transaction fees from Shopify?
If you use a third-party gateway (like Omise) instead of Shopify Payments, Shopify charges:
- Basic: 2.0%
- Shopify: 1.0%
- Advanced: 0.5%
- Plus: 0.15%
Can I accept international cards?
Yes, Omise supports international Visa, Mastercard, Amex, and JCB cards.
How long do refunds take?
Card refunds typically appear in 7-14 business days. E-wallet refunds vary by provider.
Can customers save cards for future purchases?
Yes, enable saved cards feature in settings. Cards are securely tokenized.
Does it work with Shopify POS?
Yes, Omise integrates with Shopify POS for in-store payments.
Can I customize the checkout appearance?
Yes, through Shopify theme customization and custom CSS. Some limitations apply.
What happens if payment fails?
Customer sees error message and can retry with same or different payment method. Order remains in pending status.
Is it compatible with other Shopify apps?
Generally yes, but test with your specific apps. Most apps work fine with Omise.
How do I contact support?
Email support@omise.co or use in-app chat in Shopify admin or Omise Dashboard.
Next Steps
- Magento Plugin - Magento integration guide
- Dashboard Guide - Manage payments in dashboard
- Testing Guide - Test your integration
- Payment Methods - Learn about payment methods
Additional Resources
Need help? Contact our support team at support@omise.co or visit the Help Center.